

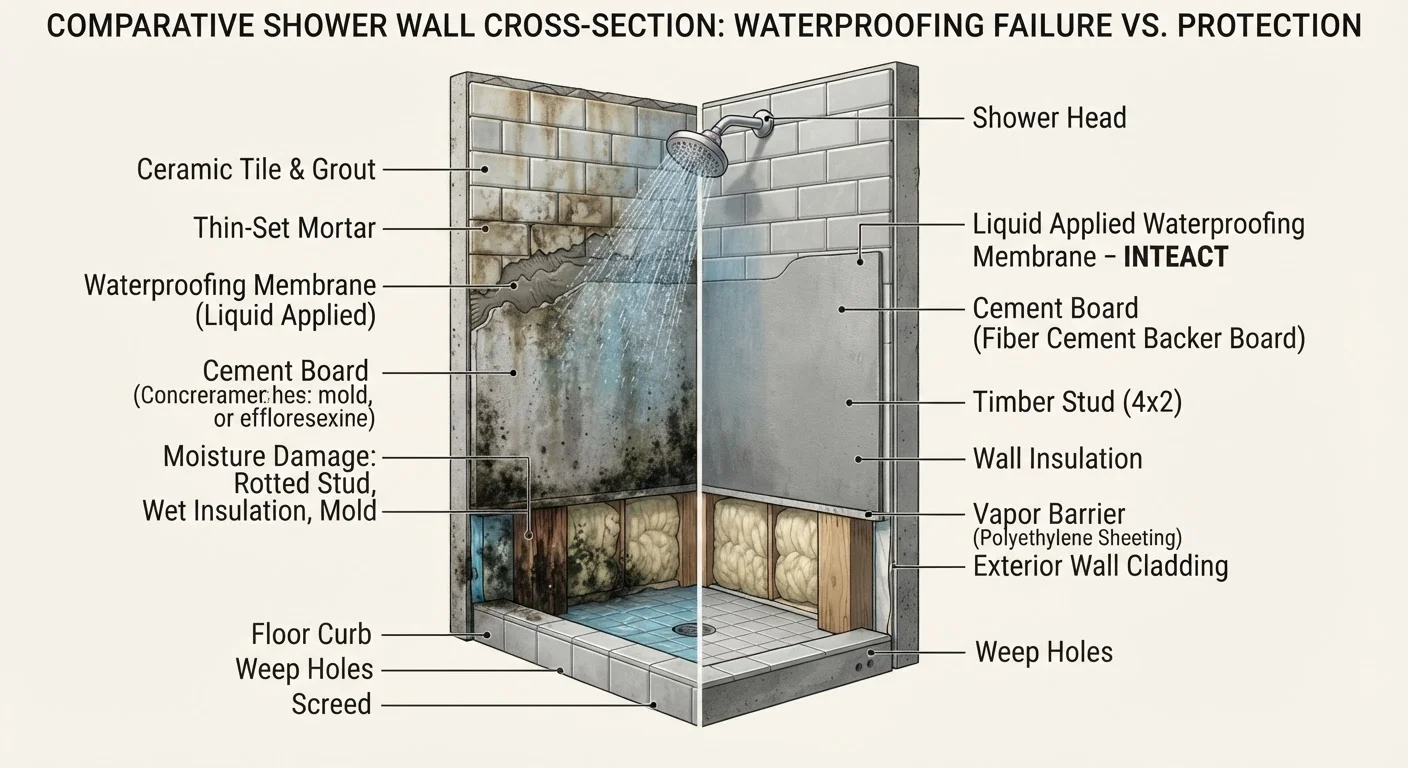
Why Bathroom Waterproofing Failures Are So Costly
Water is patient. A pinhole in a shower membrane or an unsealed corner seam allows moisture to migrate slowly into the wall cavity over months — sometimes years — before any visible sign appears. By the time you notice a soft spot in the floor, a bubbling tile, or a musty odor that won't clear, the damage may already extend to the subfloor, wall framing, and insulation behind the wet area.
Remediation at that stage typically means stripping the entire tiled surface, treating or replacing structural materials, and starting the waterproofing process from scratch. The financial and practical disruption is significant. This makes waterproofing one of the highest-consequence decisions in any bathroom renovation — not an afterthought, and not an area where shortcuts pay off.
If you're thinking through which repairs to prioritize in a home with multiple issues, our guide to prioritizing repairs can help you weigh consequences by risk level.
~70%
Of water damage claims with a bathroom source
Industry estimates suggest the majority of residential water damage insurance claims involve bathroom plumbing or moisture failures, according to general insurance industry reporting.
3–5×
Cost multiplier for delayed moisture repairs
Remediation costs — including mold removal, structural drying, and substrate replacement — can be several times higher when damage is caught late versus early.
The Mistakes That Let Water In
Most waterproofing failures don't happen because of unusual circumstances — they happen because of predictable, avoidable errors repeated across thousands of renovations each year. Understanding where these failures originate helps you ask the right questions, whether you're hiring a contractor or managing a project yourself.
Skipping a dedicated waterproofing membrane entirely and relying on tile adhesive or grout to seal the surface.
Why it happens: Homeowners and even some general contractors underestimate how much water penetrates tile joints. The tile surface looks solid, creating a false sense of protection.
Failing to properly waterproof corners, seams, and pipe penetrations where movement and gaps are most likely.
Why it happens: Flat surfaces are easy to coat; transitions are fiddly and time-consuming, so they're often rushed or treated identically to flat areas without reinforcement.
Using incompatible or mismatched waterproofing products — for example, applying a liquid membrane over a substrate it's not rated for.
Why it happens: There are many membrane products on the market, and packaging can be unclear about substrate compatibility. DIYers often select based on price or availability rather than suitability.
Applying liquid membrane too thinly or skipping the recommended number of coats.
Why it happens: Liquid membranes appear to cover quickly, and saving product feels economical in the moment. Most applicators don't measure wet film thickness.
Starting tiling before the membrane has fully cured.
Why it happens: Project timelines create pressure, and a membrane that looks dry to the eye is assumed to be ready. Curing and drying are not the same process for many products.
Omitting a membrane upstand (vertical rise) of adequate height at the floor-to-wall junction in wet areas.
Why it happens: Builders sometimes waterproof only the floor, assuming wall tile will handle vertical splash. Water pooling at the base of a shower wall exploits any gap in coverage.
Grout Is Not a Waterproofing Product
A common and expensive misconception is that grouting tiles seals the surface against water. Grout is porous and will absorb moisture over time, especially in high-use showers. It may slow penetration slightly, but it is not designed to — and cannot — replace a proper waterproofing membrane applied to the substrate before any tile is laid.
When hiring a professional for this work, a written contract that specifies materials, application methods, and inspection points is your best protection. Our guide to home improvement contracts covers the clauses that matter most before you sign.
Permits, Compliance, and Getting It Done Right
In many US jurisdictions, bathroom waterproofing — particularly in new construction or full renovations — falls under building code requirements that specify membrane type, application standards, and inspection checkpoints. Work performed without required permits can complicate home sales, insurance claims, and future renovations.
Waterproofing Failures Can Void Your Homeowner's Insurance
Some insurers treat moisture damage resulting from improper installation as a maintenance issue rather than a covered loss. If waterproofing work was performed without required permits or by an unlicensed contractor, claim disputes become significantly more likely. Before starting any bathroom renovation, confirm what your policy requires and whether the work needs a licensed trade. See our guide to permits and licensed trades for a fuller picture.
Even when permits aren't legally mandated for a cosmetic re-tile, following code-level standards is sound practice. It creates a documented record, ensures the work meets a baseline that's been vetted by building science professionals, and protects the next owner as much as the current one.
If your project involves multiple systems — plumbing rough-in, subfloor repair, or structural changes — the scope may require more oversight than a simple re-seal. A licensed trades and permits overview is a practical starting point for understanding your obligations before work begins.
This article provides general home improvement information and is not a substitute for advice from a licensed contractor, building inspector, or your local authority having jurisdiction. Always verify local building codes and permit requirements before starting renovation work.
The content on this site is for informational purposes only and is not a substitute for professional advice. Always consult a qualified professional for guidance specific to your situation.